
Ever dreamt of building something awesome with your own two hands? Something that screams freedom and gets your heart thumping? Well, honestly, learning how to make a gocart is one of those projects that delivers on all fronts. It’s not just about getting a cool ride; it’s about the satisfaction of creating it from scratch.
I remember the first time I thought about building a go-kart. I was a kid, flipping through old magazines, totally captivated by these simple, speedy machines. The idea of taking raw materials and turning them into something that moved, something I could drive – it felt like pure magic. And guess what? It still does. It’s a fantastic journey, full of learning, a few scraped knuckles, and immense reward.
Look, whether you’re a seasoned mechanic or someone who’s just curious, diving into a DIY go-kart project is completely doable. We’re going to walk through everything you need to know, from picking your parts to that thrilling first ride. Let’s get started on bringing your backyard dream to life.
Key Takeaways
Getting Started: Plans, Tools, and the Right Mindset
Before you even think about buying a single piece of tubing, you need a plan. Trust me on this. The first time I tried building a go-kart, I made the mistake of just winging it, sketching ideas on scrap paper. It led to a lot of wasted time, a few re-dos, and frankly, some pretty wobbly components. Don’t be like young me!
You’ll want to find some good DIY gocart blueprints free online, or even invest in a detailed set of plans. These plans will typically cover go-kart frame dimensions, material lists, and step-by-step instructions for building a gocart. They’re invaluable, especially for easy gocart plans for beginners.
Once you have your plans, it’s time to gather your arsenal of essential tools for gocart fabrication. You’re going to need more than just a wrench and a screwdriver. Here’s a quick list of what you’ll most likely need:
- A welding machine (a MIG welder is great for beginners)
- An angle grinder with cutting and grinding discs
- A drill (and a set of drill bits for metal)
- A tubing bender (if your design involves complex curves)
- Measuring tape, squares, and clamps – lots of clamps!
- Safety gear: welding helmet, gloves, safety glasses, ear protection
Having the right tools not only makes the job easier but also safer. And let’s be real, you want to enjoy this, not get frustrated by trying to cut steel with a hacksaw all day.
Pro Tip: Don’t skimp on safety gear. Always wear appropriate protection when cutting, grinding, or welding. A few extra bucks now can save you a lot of pain and a trip to the emergency room later.
Picking Your Power: Choosing the Right Small Engine
Alright, let’s talk about the heart of your machine: the engine. When you’re wondering what materials do I need to build a gocart, the engine is often the first big decision. For a homemade go-kart, you’re usually looking at a small engine – something like a 5-13 horsepower (HP) gasoline engine. These are commonly found in lawnmowers, pressure washers, or generators.
The best engine for DIY gocart project often depends on your specific goals. Do you want something really quick for flat pavement, or a beast for a homemade off-road gocart design? A 6.5 HP “clone” engine (like the Predator 212cc) is super popular because it’s reliable, relatively inexpensive, and easy to find parts for. For something with a bit more oomph, you could look at a 9-13 HP engine, but remember, more power also means you need stronger components everywhere else.
You’ll also need to consider your drivetrain. This often involves a sprocket and chain system to get power from the engine to the axle. For a smoother ride and better low-end torque, especially for off-road go-karts, a torque converter is an excellent addition. It acts like an automatic transmission, adjusting gearing as you speed up or slow down, making the ride much more enjoyable and easier on the engine.
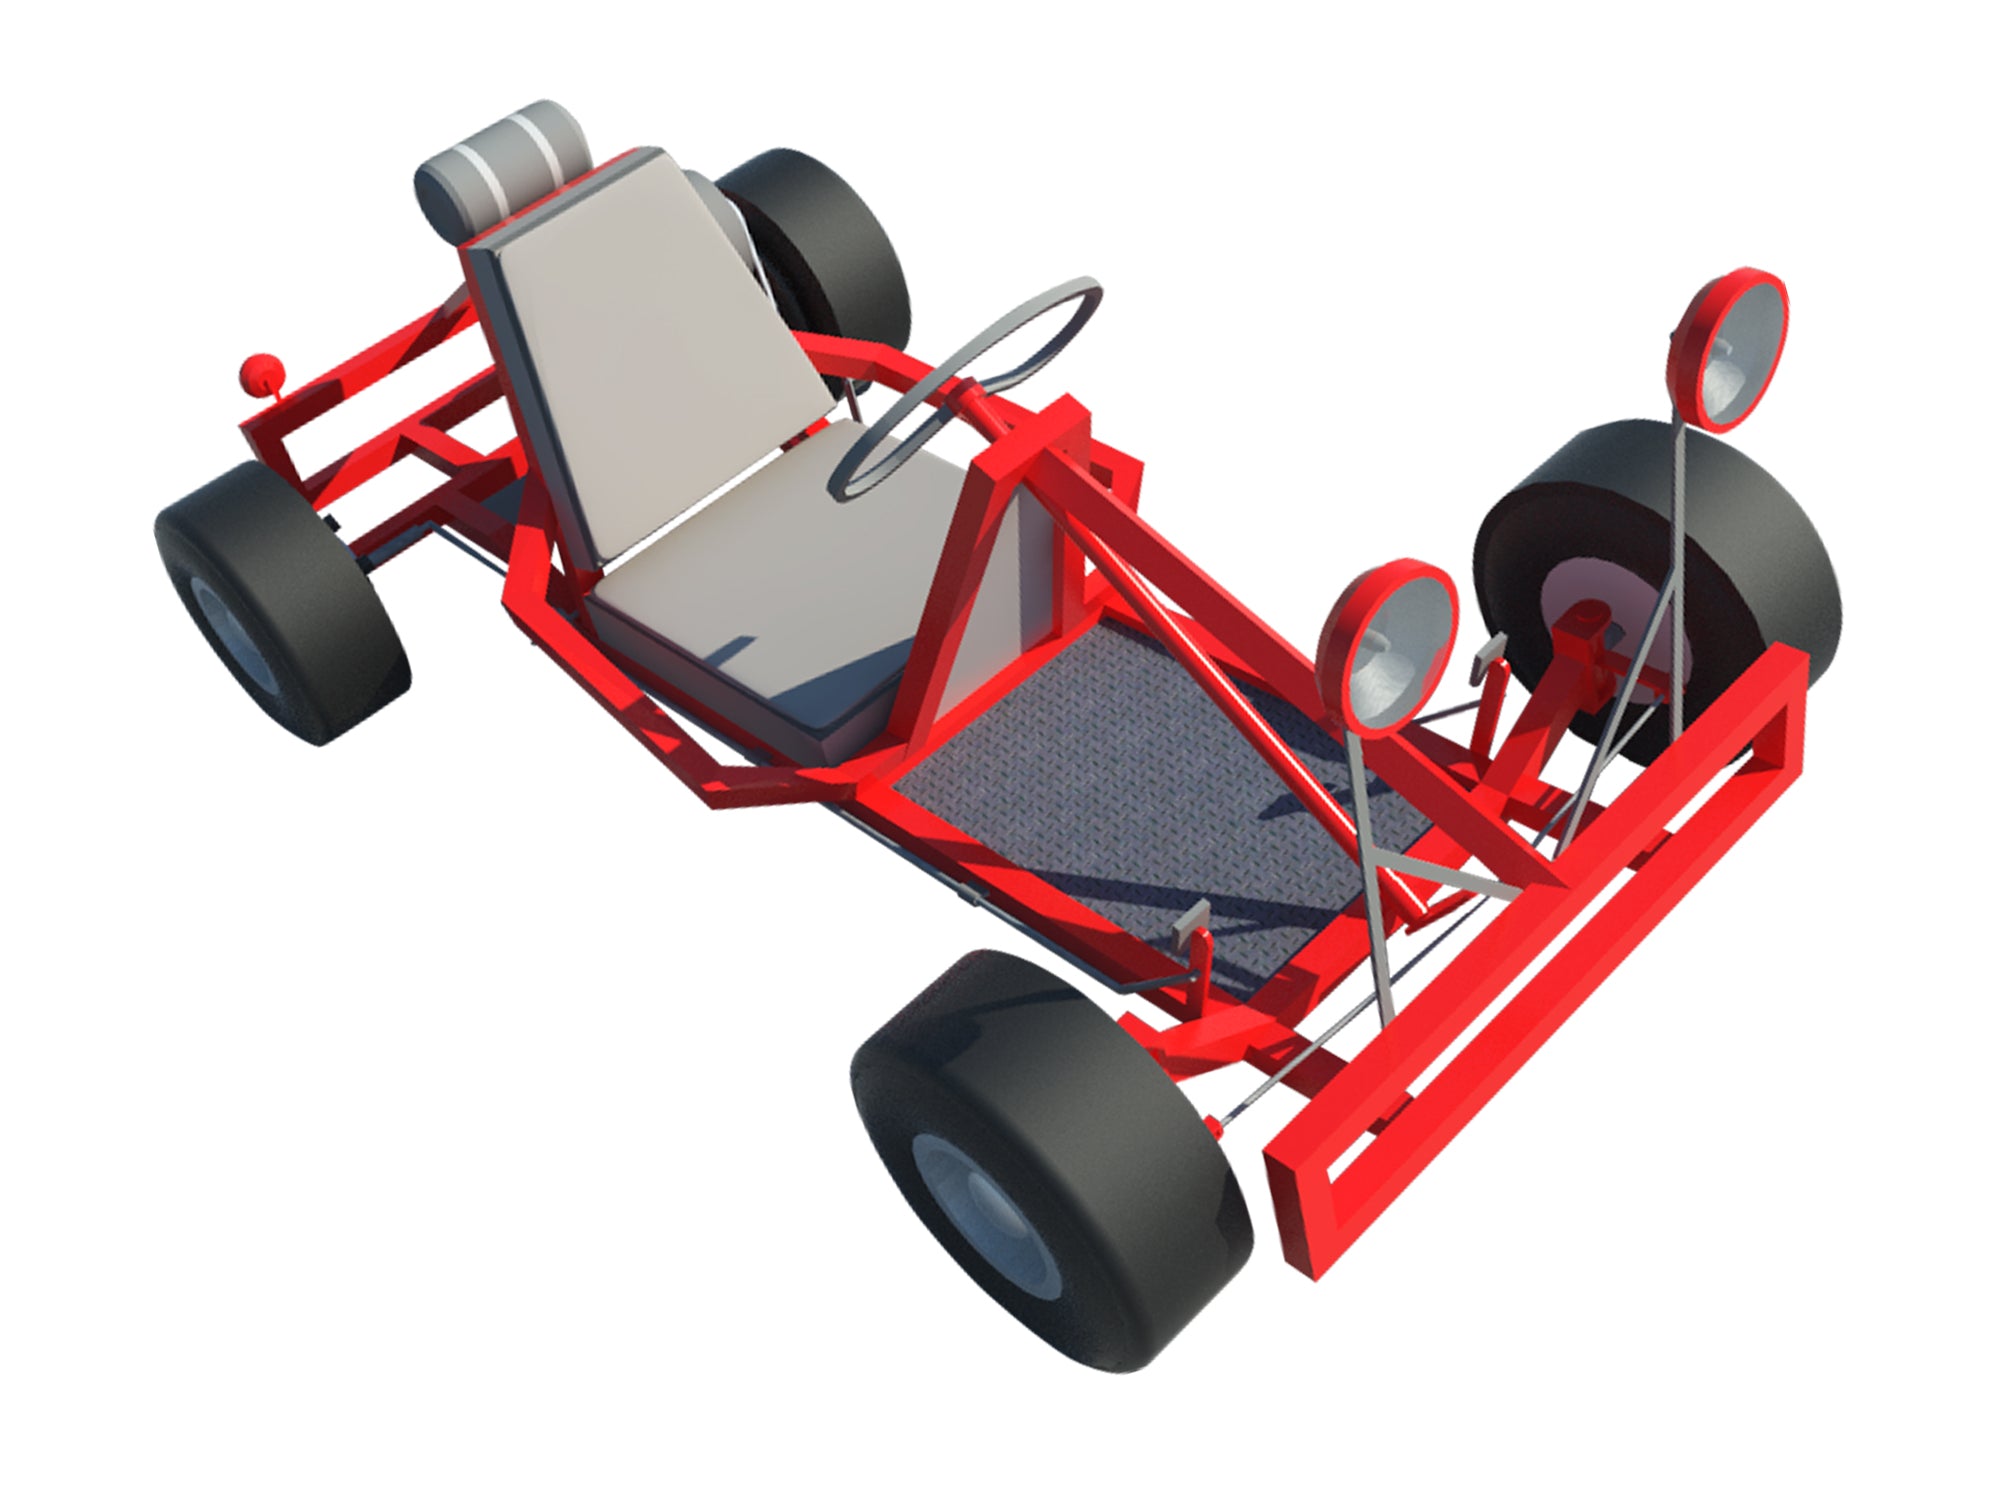
Frame Fundamentals: Go-Kart Frame Design and Materials
The frame is literally the framework of your entire go-kart. Its design dictates everything from stability to how comfortable the ride will be. Most DIY go-kart frames are made from steel tubing, usually square or rectangular. Square tubing, like 1″ x 1″ or 1″ x 2″ with a 1/8″ wall thickness, is often preferred for its strength and ease of welding.
When you’re looking at DIY gocart frame dimensions in your plans, you’ll see details about wheelbase, track width, and ground clearance. For a backyard go-kart, you want a sturdy design that can handle a bit of abuse. The weight of the rider, the engine, and the intended terrain all factor into how robust your frame needs to be.
Building the frame often involves cutting your steel tubing to precise lengths, then welding them together. A MIG welder is probably your best friend here. It’s relatively easy to learn, and it makes strong, clean welds, which is absolutely critical for the safety and integrity of your go-kart.
Here’s a look at common frame materials and their characteristics:
| Material Type | Pros | Cons | Typical Application |
|---|---|---|---|
| Square Steel Tubing (1″ x 1″ – 1″ x 2″) | Strong, rigid, easy to weld, cost-effective | Can be heavy, less aesthetic for complex curves | Most homemade go-kart frames |
| Round Steel Tubing (1″ – 1.5″ diameter) | Lighter (for comparable strength), aesthetically pleasing | Requires a tubing bender for curves, harder to align for welding | Higher performance, custom designs |
| Aluminum Tubing | Very light, corrosion resistant | More expensive, requires specialized welding (TIG), less impact resistant | Race karts, specialized builds |
Steering and Stopping: Linkage, Axle, and Brakes
This is where your go-kart starts to feel like a real vehicle. A solid steering linkage is a must for control. You’ll typically use a steering wheel connected to a steering shaft, which then connects to tie rods that move your front wheels. Getting the geometry right is important for smooth turning and preventing weird handling at speed.
For the rear, you’ll need a live axle kit. This means both rear wheels are driven. Your live axle will run through axle bearings mounted to the frame, allowing it to spin freely. This is where your sprocket and chain will connect, transferring power from the engine. You’ll also mount your go-kart wheels and tires to this axle, as well as the brake disc.
Speaking of brakes, you need them! Seriously, don’t skimp on the braking system when you’re figuring out how to build a safe backyard gocart. A single hydraulic brake caliper clamping onto a brake disc mounted on the rear axle is a common and effective setup. Make sure your brake calipers are properly aligned and bled for maximum stopping power. It’s not just about going fast, it’s about stopping safely.
The Drivetrain: Sprocket, Chain, and Torque Converter
Let’s dive a little deeper into how your go-kart moves. The drivetrain is what takes the power from your engine and puts it to the wheels. At its core, it’s usually a simple sprocket and chain setup. You’ll have a small drive sprocket on the engine (or torque converter output shaft) and a larger driven sprocket on your live axle.
The ratio between these two sprockets determines your go-kart’s acceleration and top speed. A larger driven sprocket on the axle gives you more torque (better acceleration, especially off-road), but less top speed. A smaller one means higher top speed but slower acceleration. It’s a fun balance to play with, especially if you’re experimenting with different setups.
As I mentioned earlier, a torque converter is a real game-changer. Instead of a centrifugal clutch (which is basically an on/off switch for power), a torque converter continuously adjusts the gear ratio based on engine RPMs. This means smoother acceleration, better hill-climbing, and less strain on your small engine. If your budget allows, I definitely recommend one, especially for a homemade off-road gocart design.
Assembly and Safety: Putting It All Together
Once you’ve got your frame built, engine mounted (using an engine mounting plate, of course!), and all your components ready, it’s assembly time. This is where all those individual parts start to come together. Mount your axle bearings, attach the steering linkage, install the brake calipers, and connect your throttle and brake cables.
When assembling, pay close attention to every bolt and nut. Use lock washers or thread locker where appropriate to prevent anything from vibrating loose. Double-check all your connections. A loose steering tie rod or a failing brake cable is not something you want to discover mid-ride!
Safety should be your absolute top concern when you’re building a gocart. Here are a few things to keep in mind:
- Roll Bar/Cage: If you’re building an off-road kart, a robust roll bar or even a full roll cage is a very good idea.
- Seatbelt: A simple lap belt can help keep the rider secure.
- Kill Switch: An easily accessible engine kill switch is non-negotiable.
- Guards: Cover any moving parts like the chain and sprockets to prevent clothing or body parts from getting caught.
- Sharp Edges: Grind down any sharp edges on the frame.
Making sure your go-kart is safe isn’t just a suggestion, it’s a critical part of the build. You’ll feel much better taking that first spin knowing you’ve considered every safety measure.
Build a Go-Kart Without Welding? It’s Possible!
Many folks shy away from building a go-kart because they don’t have a welding machine or aren’t comfortable welding. Well, I’ve got good news: you can absolutely build a go-kart without welding! It might take a bit more planning, but it’s totally achievable.
Instead of welding, you’ll use bolts, plates, and angle iron to join your frame components. This typically involves a lot of drilling and precise cutting. You can use pre-drilled brackets and heavy-duty bolts to connect sections of tubing. Some DIY go-kart plans for beginners are specifically designed for bolt-together construction, making this an accessible option. While a welded frame generally offers superior rigidity and simpler construction, a well-designed bolted frame can be surprisingly strong and safe for a homemade backyard go-kart.
Cost to Build a Homemade Go-Kart
So, what does it cost to build a homemade gocart? This is a question everyone asks, and the answer, as always, is: “it depends!” You can certainly find cheap gocart parts if you’re resourceful.
If you’re starting from scratch with all new parts, you’re probably looking at anywhere from $500 to $1,500+. The engine will be one of your biggest expenses, ranging from $150-$400. A live axle kit, go-kart wheels and tires, and brake components can add another $200-$500. Steel tubing for the frame might be $100-$200.
However, if you’re savvy about where to find cheap gocart parts, you can significantly reduce this. Salvaging an engine from an old lawnmower, using scrap metal for the frame, or buying used wheels can drop the cost considerably. The real fun of a DIY project often comes from scrounging for parts and getting creative with what you have. A gocart kit vs scratch build is another cost consideration; kits can be pricier but offer convenience and guaranteed compatibility.
Regardless of your budget, remember to prioritize quality for safety-critical components like brakes and steering linkages. Don’t cheap out on those!
Frequently Asked Questions
Q: How much horsepower do I need for a go-kart?
A: For a basic backyard go-kart, a 5-8 HP small engine is usually sufficient. If you plan on off-roading or want more speed, you might consider something in the 9-13 HP range. Anything above that usually requires more specialized components and a much sturdier frame.
Q: Can I use an old lawnmower engine for my go-kart?
A: Yes, many people use old lawnmower engines for their DIY go-kart projects. Just ensure the engine is in good working order and has a horizontal shaft. You’ll likely need to adapt an engine mounting plate and a clutch or torque converter to connect it to your axle.
Q: What’s the difference between a live axle and a dead axle?
A: A live axle drives both rear wheels, giving you better traction and power delivery, which is typical for most go-karts. A dead axle means only one wheel is driven (or neither, if it’s the front axle), with the other wheel spinning freely on a spindle. Most performance and off-road go-karts use a live axle kit.
Q: Do I need a torque converter, or will a centrifugal clutch work?
A: A centrifugal clutch is simpler and cheaper, working fine for basic, light-duty go-karts on flat terrain. However, a torque converter offers much smoother acceleration, better low-end power, and is ideal for heavier karts, varied terrain, or if you want a more refined driving experience. It’s worth the investment if your budget allows.
Q: Is it really hard to build a go-kart?
A: It’s a project that requires patience, some basic mechanical aptitude, and a willingness to learn, but it’s far from impossible. With good DIY go-kart plans, the right tools, and a focus on safety, even beginners can successfully build a homemade go-kart. It’s incredibly rewarding!
So, are you ready to get your hands dirty and build something truly special? What part of the process are you most excited to tackle first?


Leave a Reply