Ever walked past a garden exploding with roses and thought, “Wow, I wish I could do that?” Well, guess what? You absolutely can! Growing roses isn’t some secret art reserved for master gardeners. It’s actually a super rewarding hobby that brings so much joy and beauty to your outdoor space.
Honestly, I used to be intimidated by roses. They seemed so delicate, so demanding. The first time I tried to grow roses, I made the mistake of just sticking a bare-root plant into the ground without much thought about the soil or sun. Needless to say, it didn’t thrive. It barely survived! But I learned a ton from that initial misstep. With a little guidance and a few key practices, you’ll be enjoying your own gorgeous rose garden in no time.
This guide is all about giving you the practical, down-to-earth advice you need to grow roses that don’t just survive, but truly flourish. We’ll cover everything from picking the right plant to tackling common issues, making sure you feel confident every step of the way. Let’s dig in!
Key Takeaways
Step 1: Choosing the Right Roses for Your Garden

Okay, this is where it all starts. Don’t just grab the first pretty rose you see! Thinking about what kind of rose fits your climate, space, and commitment level will save you a lot of headaches later on. Different roses have different needs, and picking the right one is half the battle.
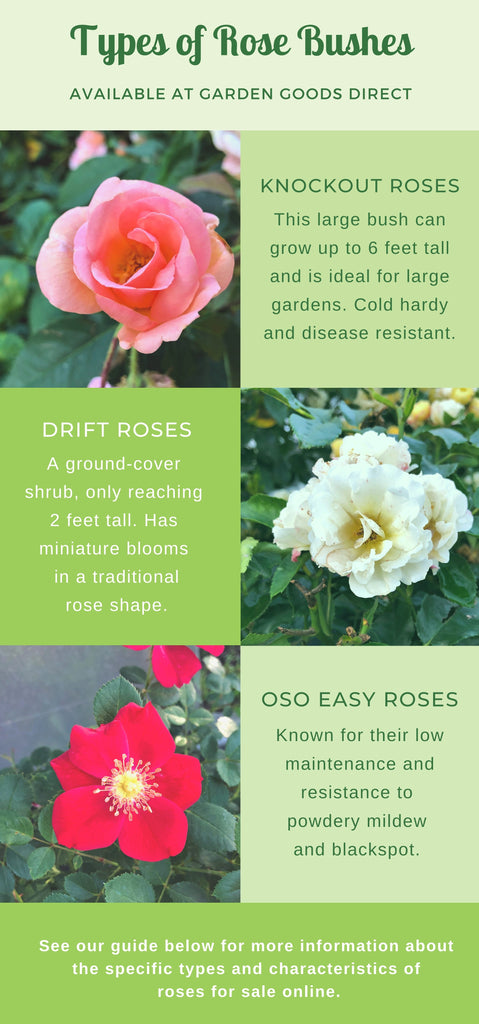
For beginners, I always recommend starting with some of the easier roses to grow. These varieties are often more disease-resistant and forgiving, giving you a better chance at early wins. Hybrid Teas and Floribundas are popular, but don’t overlook some of the simpler shrub roses or Knock Out roses.
Let’s look at a few types that are great for beginners:
- Shrub Roses: These are generally tough, low-maintenance, and come in a huge range of sizes and colors. Many are exceptionally disease-resistant.
- Floribunda Roses: They produce clusters of flowers rather than single blooms, giving a really showy display. They’re usually quite hardy and relatively easy to care for.
- Grandiflora Roses: A mix between Hybrid Teas and Floribundas, offering large, classic blooms often in clusters. They can be a bit more particular but many varieties are quite robust.
- Climbing Roses: If you’ve got a fence, arbor, or wall you want to cover, climbing roses are fantastic. We’ll talk more about training them later, but for now, know that some varieties are much easier to manage than others. Look for options like ‘New Dawn’ or ‘Iceberg’ as best climbing roses for beginners.
When you’re at the nursery, look for healthy plants with sturdy stems and no yellowing leaves or obvious signs of pests. A good root system is also key, so if you can gently check the bottom of the pot, look for white, healthy roots, not tangled brown ones.
Step 2: Picking the Perfect Spot: Sun and Soil Matter

Just like real estate, location, location, location is everything for roses! They’re sun worshippers, plain and simple. We’re talking about needing at least six to eight hours of full sun exposure daily. Anything less, and you’ll get leggy plants with fewer, weaker blooms. So, scout your yard during different parts of the day to find that sweet spot.
Once you’ve found the sunny spot, let’s chat about soil. Roses love rich, well-draining soil. If your soil is heavy clay, it’s going to hold too much water, which can lead to root rot. If it’s super sandy, it’ll drain too fast and dry out quickly, starving your roses of moisture and nutrients.
Here’s what I do: I always amend my soil heavily. I’ll dig a hole much wider than the rose’s root ball – sometimes two to three feet wide! Then, I mix the excavated soil with plenty of compost, well-rotted manure, and a good quality topsoil. This creates a fluffy, nutrient-rich home for those roots. Adding a bit of bone meal to the bottom of the planting hole also gives them a great phosphorus boost right from the start.
Pro Tip: Don’t forget drainage! If you have really dense clay soil, consider planting your roses in raised beds or creating a slight mound to plant on. This small adjustment can make a world of difference in keeping their roots happy and preventing waterlogging.
Step 3: Planting Your Roses: The Right Way
:max_bytes(150000):strip_icc()/how-to-plant-roses-1403055_FINAL-2-5c47621c46e0fb0001b8184b.png)
You’ve picked your roses and found their perfect sunny home. Now comes the exciting part: planting them! How you plant them really sets the stage for their future growth. Let’s make sure we get this right.
If you’ve got bare-root roses (plants sold without soil around their roots), soak them in a bucket of water for a few hours before planting. This rehydrates them. For potted roses, gently remove them from their container, loosening any circling roots at the bottom.
Dig a hole that’s wide enough for the roots to spread out comfortably and deep enough so that the bud union (that knobby part where the rose was grafted onto the rootstock) is either at or slightly below soil level in colder climates, or slightly above in warmer ones. In most temperate regions, planting the bud union about 1-2 inches below soil level offers good protection.
Place your rose in the center of the hole, spreading out the roots. Backfill with your amended soil, gently tamping it down to remove air pockets. Water thoroughly after planting. This helps the soil settle around the roots and gives your new rose a good drink. Don’t forget to mulch around the base!
Step 4: Watering Wisdom: Keeping Your Roses Hydrated
Water is life, especially for thirsty roses! They prefer deep, infrequent watering rather than shallow, frequent sprinkles. Why? Deep watering encourages the roots to grow down deeper into the soil, making the plant more resilient to dry spells.
How often should you water? Well, that depends on your climate, soil type, and the size of your roses. As a general rule, aim for 1-2 inches of water per week, either from rain or irrigation. In hot, dry weather, you might need to water every few days. The key is to check the soil. Stick your finger about two inches deep; if it feels dry, it’s time to water.
When you water, try to direct the water to the base of the plant, avoiding getting the foliage wet, especially in the evening. Wet leaves, particularly overnight, can encourage fungal diseases like black spot disease, which is a real pain. Drip irrigation or soaker hoses are fantastic for this, delivering water directly where it’s needed most.
Step 5: Feeding Your Flowers: Fertilizer for Roses

Think of fertilizer as food for your roses. They’re heavy feeders, meaning they appreciate a consistent diet to produce all those amazing blooms. A good fertilizer routine will make a noticeable difference in their vigor and flower production.
When it comes to fertilizer recommendations for roses, you’ll find a lot of options. Many gardeners, myself included, use a balanced granular fertilizer specifically formulated for roses. These usually have an NPK (nitrogen, phosphorus, potassium) ratio that’s just right, often with added micronutrients. For example, a 5-10-5 or 10-10-10 granular fertilizer works well.
I usually start feeding my roses in early spring, right after the first flush of new growth appears. Then, I’ll continue feeding every 4-6 weeks through the growing season, usually stopping about 6-8 weeks before your first expected frost. This gives the new growth time to harden off for winter. For climbing roses, consistent feeding is even more important as they put out so much new growth.
Bone meal, as mentioned earlier, is great for phosphorus, which helps with root development and flowering. You can sprinkle it around the base of the plant once or twice a season. Another option is a liquid feed, which provides a quicker boost but needs to be applied more often. Whatever you choose, always follow the package instructions carefully to avoid over-fertilizing, which can burn the roots.
Step 6: Pruning for Perfection: Shape, Health, and Blooms
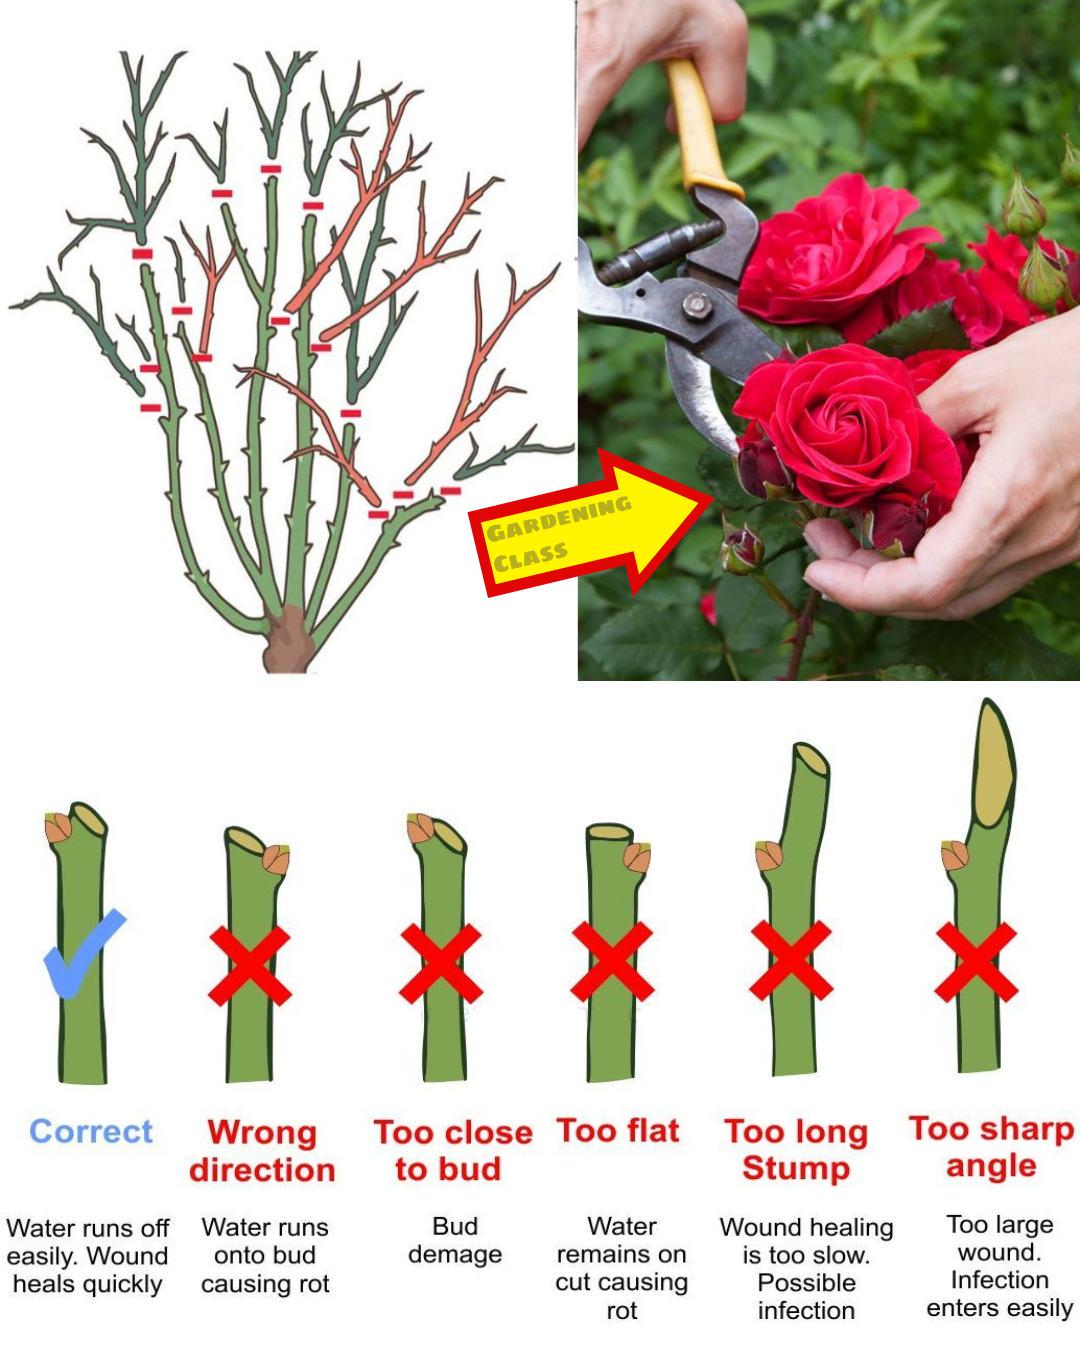
Pruning might seem scary at first, but it’s one of the most important things you can do for your roses. It’s not just about shaping; it’s about promoting air circulation, removing dead or diseased wood, and encouraging new, strong growth that will give you abundant blooms. Good pruning is arguably the single most impactful thing you can do for a healthy, floriferous rose bush.
You’ll want a good pair of sharp pruning shears. Trust me, cheap, dull ones will just frustrate you and damage your plants. Always make clean cuts. Here’s a quick guide to pruning:
| Pruning Task | When to Do It | Why It’s Important |
|---|---|---|
| Major Winter Pruning | Late winter or early spring (dormant season) | Removes dead/damaged canes, shapes the bush, encourages vigorous new growth and a big flush of spring blooms. |
| Deadheading | Throughout the blooming season | Removes spent flowers, signals the plant to produce more blooms instead of seeds. Cuts should be made above a 5-leaflet leaf facing outwards. |
| Removing Suckers | Anytime you see them | Suckers are growths from below the bud union (rootstock). They steal energy from your desired rose. Remove them at their origin point. |
| Light Maintenance Pruning | Throughout the growing season | Removes any crossing branches, weak growth, or branches rubbing against each other to improve air circulation and prevent damage. |
When you’re pruning, always aim to open up the center of the bush to allow for good air movement. This helps prevent fungal diseases. Cut at a 45-degree angle about 1/4 inch above an outward-facing bud. This encourages new growth to spread outwards, rather than inwards.
Step 7: Battling the Baddies: Pests and Diseases

Okay, let’s be real: roses can attract their fair share of unwanted visitors and illnesses. But don’t despair! With a little vigilance and the right approach, you can keep them healthy. The trick is to identify problems early.
Common Rose Pests:
- Aphids: These tiny, soft-bodied insects cluster on new growth and buds, sucking out sap. A strong spray of water from the hose can often knock them off. For persistent infestations, insecticidal soap works wonders.
- Spider Mites: You might not see these tiny mites, but you’ll notice fine webbing on the undersides of leaves, and foliage might look stippled or yellow. They love hot, dry conditions. Again, a strong spray of water on the undersides of leaves helps.
- Rose Slugs (Sawflies): These small, caterpillar-like larvae chew holes in leaves, often leaving a skeletonized appearance. Hand-picking or insecticidal soap can control them.
Common Rose Diseases:
- Black Spot Disease: This is probably the most common and recognizable rose disease. It starts as black spots on leaves, often with a yellow halo, and leads to leaf drop. Prevention is key here: ensure good air circulation, avoid overhead watering, and clean up fallen leaves immediately. Fungicides can help manage it once it appears.
- Powdery Mildew: Looks like white, powdery patches on leaves, stems, and buds. It thrives in humid conditions and can distort new growth. Good air circulation is a preventative measure; horticultural oil or sulfur sprays can treat it.
- Rust: Orange, powdery spots on the undersides of leaves and reddish-brown spots on the upper sides. This is another fungal issue that benefits from good hygiene and air flow.
If you notice your rose leaves turning yellow, it could be a few things: overwatering, underwatering, nutrient deficiency, or even a pest or disease. Check the soil moisture first, then look for signs of pests or unusual spots on the leaves.
Winterizing Your Rose Bushes: Protecting Your Precious Plants
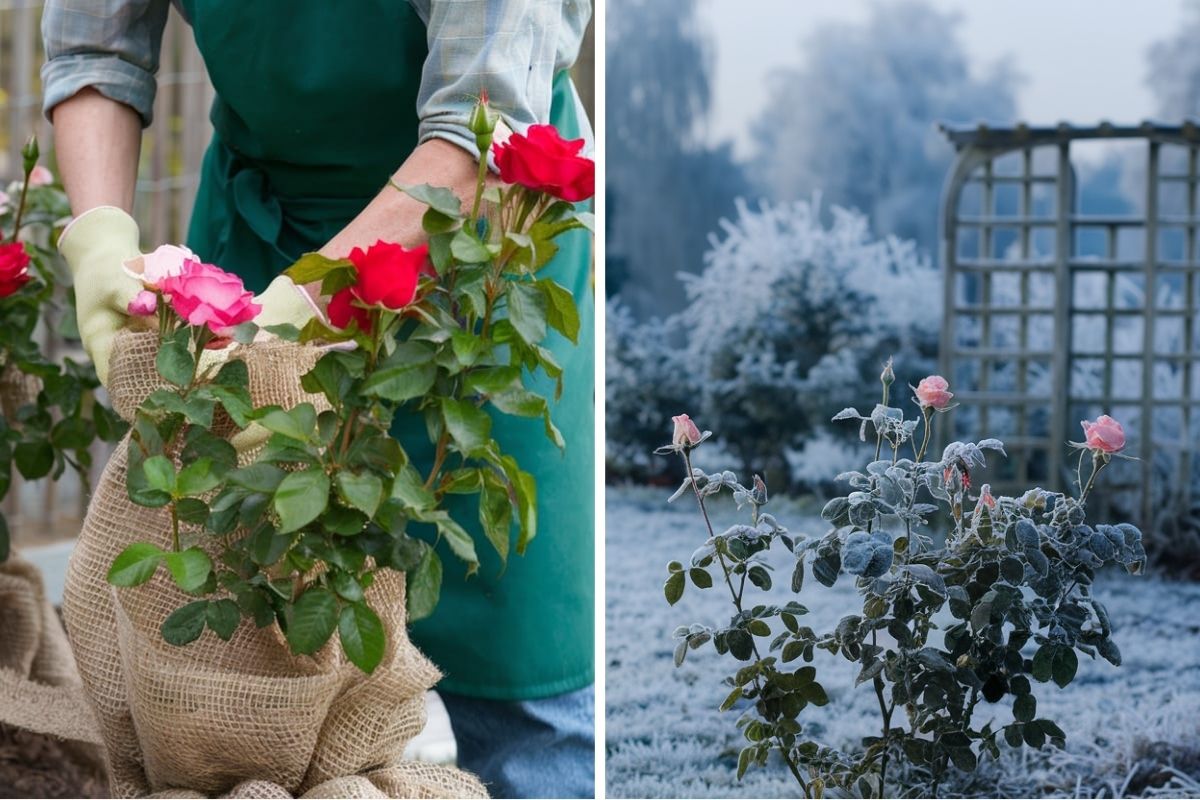
If you live in a region with cold winters, protecting your rose bushes is crucial. Winterizing rose bushes properly can make the difference between a thriving plant next spring and one that struggles or even dies back completely. This step is about insulating them from harsh temperatures and drying winds.
Around late fall, after a few hard frosts but before the ground freezes solid, it’s time to prepare. First, clean up any fallen leaves around the base of the plant. This removes potential overwintering sites for pests and disease spores. Then, you can prune back any really tall or spindly canes to prevent them from snapping in heavy snow or wind.
The most common method is to mound soil, compost, or shredded leaves around the base of the plant, forming a “cone” about 10-12 inches high. This protects the bud union, which is the most vulnerable part of the rose. For extra protection, you can place a rose collar or cylinder made of hardware cloth around the mound and fill it with more leaves or straw.
For climbing roses, gently lay them down off their support if possible, and cover the canes with burlap or a layer of straw, anchoring them to the ground. This keeps them from freezing solid. Just remember to remove these protective layers gradually in early spring once the worst of winter has passed.
Training Climbing Roses for Grand Displays
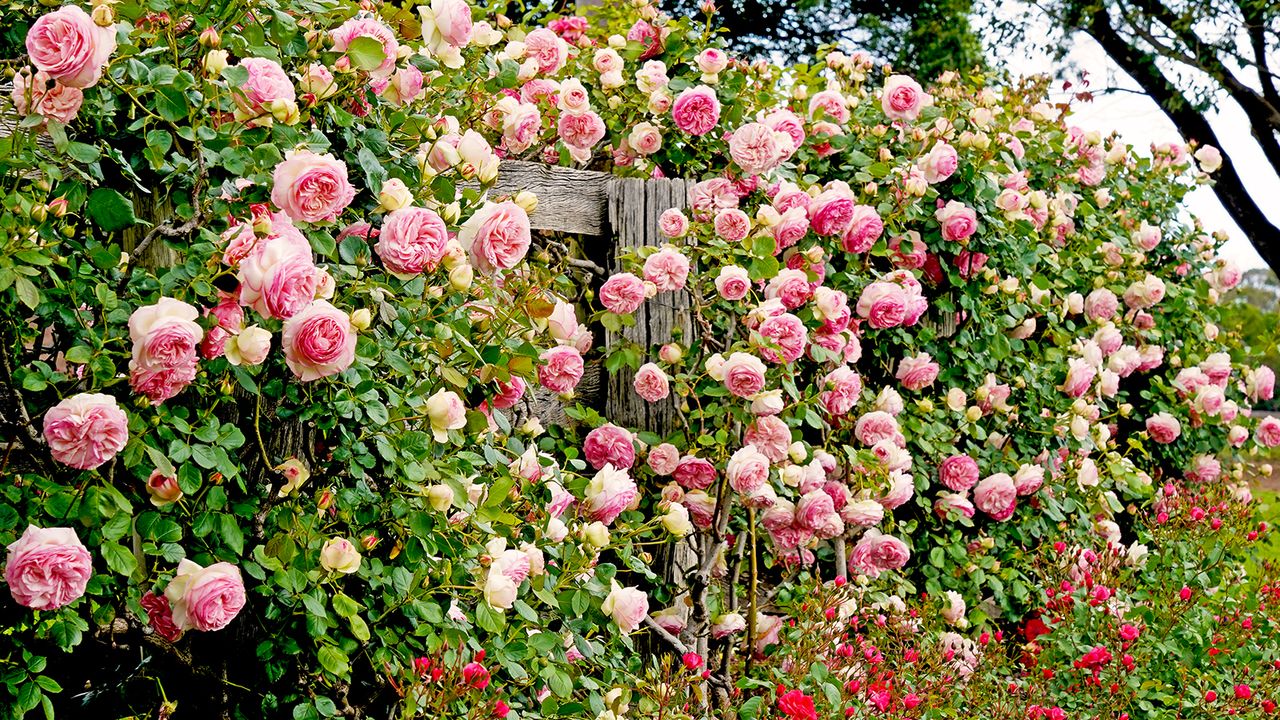
Climbing roses are absolutely magnificent when they’re trained well. They don’t actually “climb” by wrapping tendrils like a vine; instead, they produce long, flexible canes that need a little help from us to grow where we want them. The goal is to train their canes horizontally, or at least at an angle, rather than straight up.
Why horizontally? Because horizontal canes produce more lateral shoots, and those lateral shoots are where the flowers bloom! If you let a climbing rose just shoot straight up, you’ll often only get flowers at the very top. Look for best climbing roses for beginners that are known for their flexible canes.
When you’re training, gently tie the canes to your support structure – be it an arbor, trellis, or fence – using soft ties. Start training them when they’re young and pliable. As the canes grow, continue to spread them out and tie them into place. A little patience here pays off with a much fuller, more floriferous display.
Frequently Asked Questions
Q1: How much sun do roses need to grow well?
A1: Roses are sun-loving plants and need at least 6-8 hours of full sun exposure every day to produce the most abundant and healthy blooms. Less sun can lead to leggy growth and fewer flowers.
Q2: What’s the best type of fertilizer for roses, and when should I use it?
A2: A balanced granular fertilizer specifically formulated for roses (e.g., 5-10-5 or 10-10-10 NPK ratio) is often recommended. Start feeding in early spring when new growth appears, and continue every 4-6 weeks throughout the growing season, stopping about 6-8 weeks before your first expected frost.
Q3: Why are my rose leaves turning yellow?
A3: Yellowing leaves can be caused by several things: incorrect watering (too much or too little), nutrient deficiencies (especially iron or nitrogen), or the presence of pests like spider mites or diseases like black spot. Check your soil moisture, look closely for pests, and consider your feeding schedule.
Q4: What should I do about black spot disease on my roses?
A4: Black spot disease is common. To combat it, ensure good air circulation around your plants, avoid overhead watering, and always clean up fallen leaves and infected debris promptly. Fungicides can help control outbreaks, but prevention is your best approach.
Q5: Can I grow climbing roses in a small garden?
A5: Absolutely! While climbing roses can get large, many varieties can be trained to grow vertically on a trellis or fence, making them suitable for smaller spaces. Choose a less vigorous variety and be diligent with your training to guide its growth.
So, there you have it – your straightforward guide on how to grow roses that will make your neighbors stop and stare. It takes a little effort, sure, but seeing those gorgeous, fragrant blooms every year? That’s a reward that’s hard to beat. You’ve got this, and I promise the beauty they bring to your garden is absolutely worth it.
What’s your biggest rose-growing challenge, or what kind of rose are you most excited to try planting?


Leave a Reply