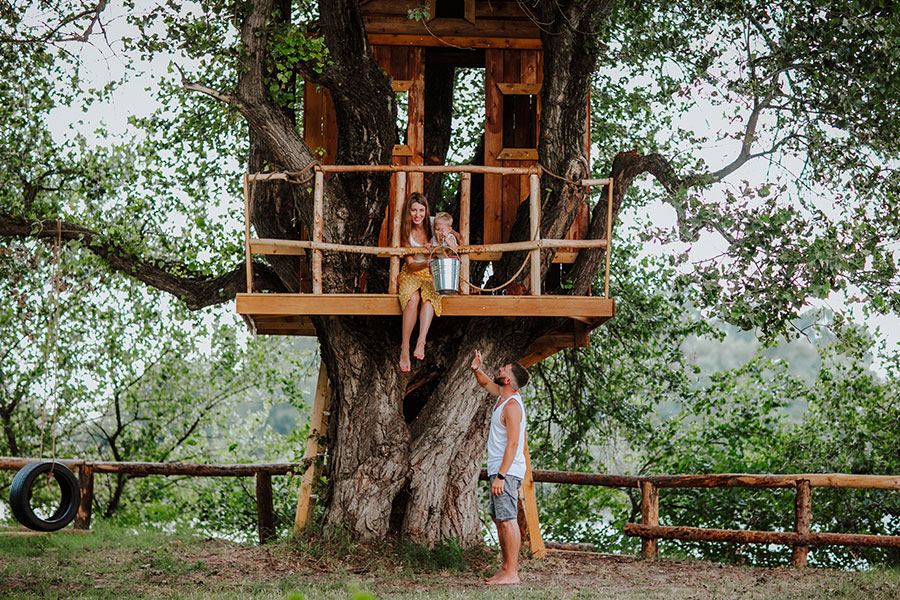
Remember that childhood dream of a secret hideout, nestled high among the leaves? Well, I do! And honestly, building a treehouse is one of those projects that truly brings out the kid in all of us. It’s more than just a structure; it’s a personal haven, a play space for kids, or even a cozy reading nook for you.
Sure, the idea of building something so high up might seem a little daunting at first. You might be thinking about complex designs, safety concerns, or how to even begin. But trust me, with the right planning, a bit of elbow grease, and some solid advice, you absolutely can make a treehouse that’s both safe and spectacular.
We’re going to walk through everything, from picking the perfect tree to attaching the platform and adding those fun finishing touches. I’ve been there, made a few mistakes (which we’ll talk about!), and learned a ton along the way. So, let’s get started on bringing that aerial dream to life!
Key Takeaways
Dreaming Up Your Treehouse Vision: What to Consider First

Alright, before you grab any tools, let’s sit down and really think about what you want. This initial planning phase is probably the most important part of learning how to make a treehouse that stands the test of time and weather. What’s the purpose of this elevated retreat? Is it a simple play area for the kids with a slide, a quiet spot for you to read, or maybe a hangout zone for teens?
You’ll want to start with a serious tree suitability assessment. Honestly, this step can make or break your entire project. Not every tree is a good candidate, and rushing this can lead to headaches later. You also need to consider treehouse design ideas for small backyards if space is limited.
One common question I hear is, “Do you need a permit to build a treehouse?” And the answer, frustratingly, is: it depends. Every municipality has different rules. Some don’t care about small, non-habitable structures, while others have strict height limits, setback rules, and require full building permits. A quick call to your local planning department can save you a ton of trouble down the road.
The first time I tried to make a treehouse, back when I was about ten, I made the mistake of picking a really skinny, young tree in the woods behind our house. My grand plans for a multi-story fort quickly turned into a wobbly platform that barely held my weight. It was a harsh lesson, but I learned then and there that the tree itself is your foundation, and you can’t skimp on assessing it correctly.
Finally, let’s talk budget. The average cost to build a DIY treehouse can vary wildly. Are you looking for a budget treehouse construction with recycled materials, or are you envisioning something more elaborate with all the bells and whistles? Setting a realistic budget upfront will help you choose your materials and design appropriately.
Picking the Perfect Tree for Your Arboreal Abode
Your tree is more than just a support structure; it’s a living, breathing part of your treehouse. So, picking the best type of tree for a treehouse is absolutely critical. You’re looking for a strong, healthy, and mature tree. Think oaks, maples, sycamores, and large evergreens like firs or hemlocks. These trees tend to have robust trunks and strong, deep root systems.
When you’re out in the yard, take a good, hard look at potential candidates. Is the tree healthy? Are there any signs of disease, large cavities, or excessive dead branches? Give the trunk a good rap, listen for any creaks or groans, and observe how it sways in the wind. You want something that looks solid and stable. Weak trees, or those with significant rot, are a no-go.
Beyond health, consider the tree’s size and shape. You’ll need enough trunk diameter to safely attach your supports. Ideally, you want a trunk that’s at least 12 inches in diameter where your primary support beams will attach. If you’re planning a larger platform, you might even consider a design that incorporates multiple trees, or a main tree with supplementary ground supports.
This is also where we discuss how to build a treehouse without harming the tree. It’s a core principle. You want to cause minimal damage and allow for future growth. Avoid girdling the tree (wrapping anything tightly around the trunk that could cut off nutrient flow) and make sure your attachment points allow for tree movement and expansion.
Essential Tools and Materials for Your Treehouse Project
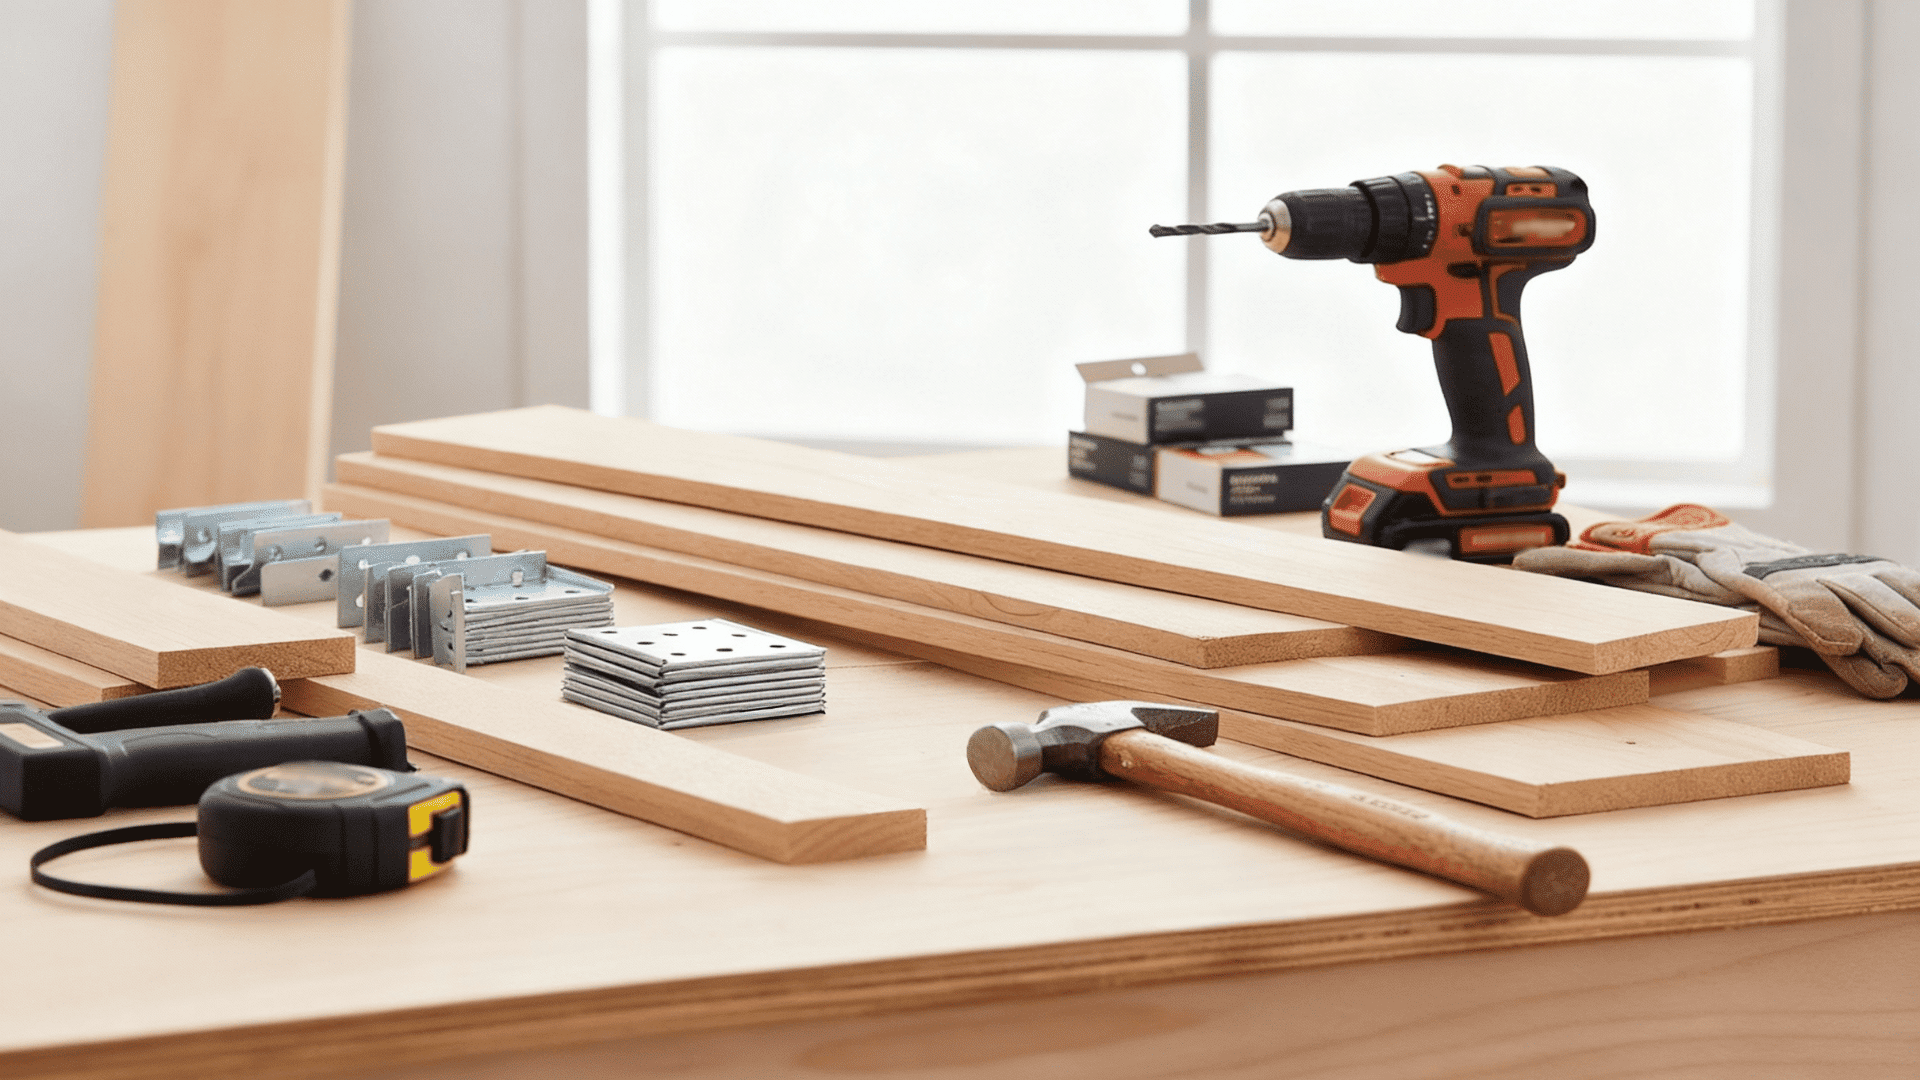
Okay, you’ve got your tree and your vision. Now, let’s gather up the goods. Knowing what materials are needed to build a treehouse, alongside the right tools, will make the whole process smoother and safer.
For tools, you’ll definitely need the basics: a good measuring tape, a level (a long one is a huge help), a sturdy drill with various bits, and a circular saw. When using a circular saw, remember circular saw safety is paramount; always wear eye protection and be mindful of your surroundings. A reciprocating saw might be handy for rough cuts or trimming. Don’t forget wrenches, clamps, and maybe even a rope and pulley system to lift heavier beams.
Now, onto materials. Here’s a general list:
- Lumber: Pressure-treated lumber for your main support beams and frame is a must, especially for anything exposed to the elements. For decking material choice, consider redwood decking for its durability and natural resistance to rot and insects, or composite decking for low maintenance.
- Plywood: Exterior-grade plywood subfloor for your platform base will provide a solid, flat surface.
- Fasteners: You’ll need plenty of galvanized hardware—screws, bolts, and washers—to prevent rust and ensure longevity.
- Treehouse Attachment Bolts (TABs): These are specialized bolts designed to allow the tree to grow around them, minimizing harm and providing extremely strong, flexible attachment points. We’ll discuss these more soon.
- Guardrail materials: For safety, especially if treehouse plans for kids with a slide are in your future.
- Roofing materials: Shingles, metal roofing, or even a tarp system for waterproofing.
- Access: Lumber for a treehouse access ladder or stairs.
When thinking about budget treehouse construction tips, consider sourcing reclaimed lumber for non-structural elements or checking local hardware stores for clearance sales on decking. Just ensure any reclaimed wood is sound and free of significant damage or pests.
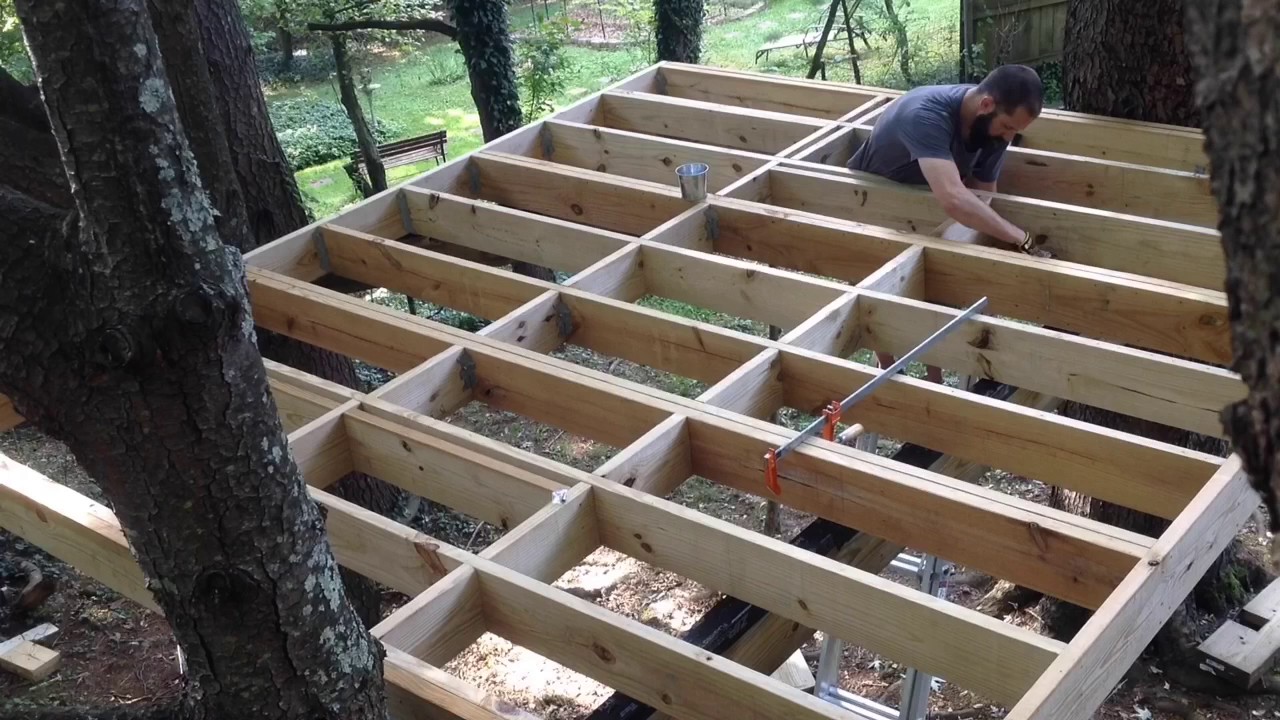
Platform Power: The Heart of Your Treehouse

This is where your treehouse truly begins to take shape. The platform is the foundation, and getting it right is crucial for stability and safety. When you’re thinking about treehouse platform design, you need to account for load bearing capacity, not just of the platform itself, but of the tree(s) supporting it.
There are several treehouse platform attachment methods. The most common and recommended approach for minimizing tree harm while ensuring maximum strength involves using Treehouse Attachment Bolts, often called TABs. These large, specially designed bolts are drilled into the tree, and then a bracket (like a floating bracket or a stationary bracket) is attached to them. This method allows the tree to grow without being girdled and provides exceptional support.
Pro Tip: When using Treehouse Attachment Bolts, always read the manufacturer’s instructions carefully. They’re engineered to work with the tree’s natural movement and growth, so proper installation is key to both safety and tree health. Don’t cheap out on these; they’re your main connection to the tree.
Once your TABs or other primary supports are in place, you’ll begin support beam installation. These main beams will form the perimeter of your platform. Use a good, long level to ensure your frame is perfectly flat. This is where leveling the frame becomes critical. If your base isn’t level, everything you build on top of it will be off-kilter, making your subsequent steps much harder.
After the main beams, you’ll install your joists, which run perpendicular to the beams and provide support for the plywood subfloor. This framework creates a robust grid that distributes the weight evenly. Secure everything with galvanized hardware, using plenty of screws and bolts to create a strong, rigid structure. Learning how to secure a treehouse to a tree properly is the single most important safety measure you can take.
Framing and Finishing: Building Up Your Walls and Roof
With your platform solid and secure, you can now move on to the fun part: framing the walls and getting a roof over your head! This is where your chosen treehouse plans really come into play. Whether you’re following beginner friendly treehouse plans or a more complex design, the principles are similar to conventional construction.
For step by step treehouse building instructions, start by framing the walls. You’ll typically use 2x4s or 2x6s, just like a small shed. Measure twice, cut once! These frames will define the shape and size of your treehouse cabin. Remember to frame out openings for windows and doors. Once your walls are up, you can sheath them with plywood, siding, or whatever material you’ve chosen.
Next comes the roof. A simple gable or lean-to roof is usually easiest for a DIY treehouse. The roof structure will need rafters, then sheathing, and finally your chosen roofing material. The goal here is twofold: protection from the elements and making sure you know how to waterproof a treehouse effectively.
One aspect you absolutely cannot compromise on is guardrail construction. If your treehouse is any significant height off the ground, especially if it’s designed as treehouse plans for kids with a slide, strong guardrails are non-negotiable. They need to be robust, securely attached, and meet local safety codes (typically 36-42 inches high with no gaps larger than 4 inches).
After the main structure is framed and enclosed, you can add your plywood subfloor if you haven’t already, then your final decking material choice on top of that. This creates a comfortable, finished surface to walk on.
Adding the Fun and Function: Access and Amenities
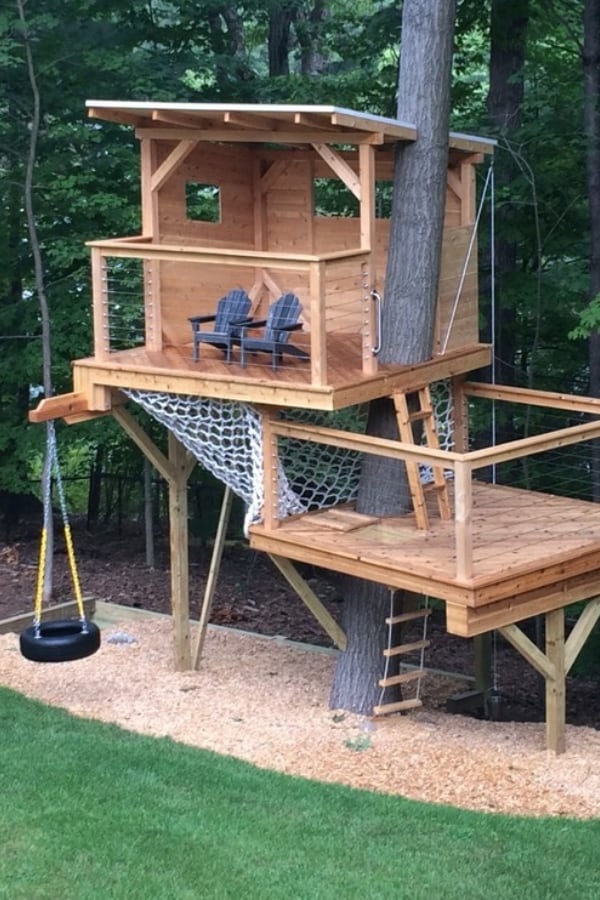
Your treehouse is almost ready! Now it’s time to think about how people will get up there, and what will make it a truly enjoyable space. The treehouse access ladder is a primary consideration. A simple rope ladder might seem fun, but a sturdy wooden ladder or even a set of stairs is much safer, particularly for kids or if you’ll be carrying things up and down.
If your treehouse is a bit more ambitious, you might consider basic treehouse electrical wiring guide concepts. This is definitely one area where I’d suggest bringing in a professional if you’re not comfortable with electrical work. For simpler needs, solar-powered lights or battery-operated lanterns can provide plenty of illumination without complex wiring.
This is also where you can add those personal touches. Maybe a small porch, a designated area for a slide if you went with those treehouse plans for kids, or even a simple rope and pulley system for hauling up snacks and drinks. Think about windows for natural light and ventilation, and perhaps a small door with a latch for that “secret hideout” feel.
Don’t forget the waterproofing details. Seal any gaps around windows and doors, and ensure your roof is watertight. A little caulk and flashing can go a long way in keeping your treehouse dry and extending its life. Adding a fresh coat of paint or stain to protect the exterior wood also makes a big difference in both appearance and longevity.
When it’s all done, step back and admire your handiwork. You’ve gone from a dream to a real, live treehouse. It’s a remarkable feeling, building something with your own hands that brings so much joy and provides a unique perspective on your own backyard.
So, what kind of adventures do you think your new treehouse will hold?

Leave a Reply