Are you looking for a fun and easy way to decorate your walls? You can make beautiful wall decor using ice cream sticks. Yes, those small wooden sticks you get with ice cream! They are cheap and easy to find. And you can create many different designs. This guide will help you make simple and pretty wall decorations with ice cream sticks.
Why Use Ice Cream Sticks for Wall Decor?
- Affordable: Ice cream sticks cost very little.
- Easy to work with: They are light and easy to cut or glue.
- Safe: No sharp edges, so safe for kids to use.
- Eco-friendly: Made from wood and can be recycled.
- Creative: You can make many shapes and patterns.
With these sticks, you can make frames, wall art, signs, and more. Let’s see some popular ideas and how to make them.
Materials You Will Need
- Ice cream sticks (wooden craft sticks)
- Glue (white glue or hot glue gun)
- Paints (acrylic or poster paints)
- Brushes
- Scissors or small saw (to cut sticks)
- Ruler and pencil
- Decorations (optional) like beads, buttons, or stickers
Simple DIY Ice Cream Stick Wall Frame
This is a great project for beginners. You can use it to hold photos or small posters.
Steps:
- Take 8 ice cream sticks.
- Lay 4 sticks side by side, touching each other.
- Use 2 sticks to glue across the 4 sticks at the back. This makes a base.
- Make a second base the same way.
- Glue the two bases together at the edges to make a square frame.
- Paint your frame in your favorite color.
- Let the paint dry.
- Attach a photo inside using tape or glue.
- Hang your frame on the wall using a hook or tape.
This frame looks great in any room. You can make many and paint them different colors.
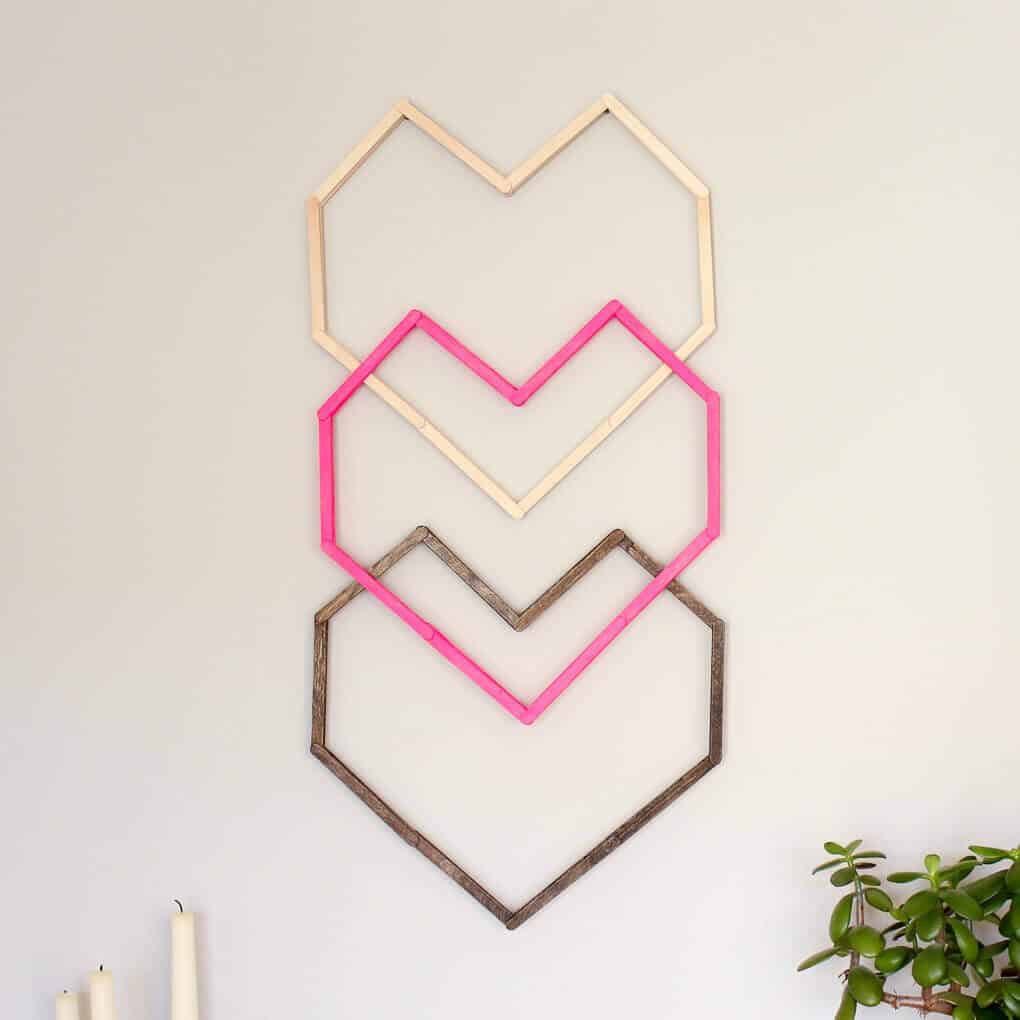
Ice Cream Stick Wall Art: Geometric Shapes
Geometric shapes are simple and look modern. You can make triangles, squares, or diamonds.
How To Make A Triangle Wall Art
- Take 3 ice cream sticks.
- Glue the ends of the sticks to form a triangle.
- Let the glue dry well.
- Paint the triangle in bright colors.
- Make many triangles of different sizes.
- Glue the triangles together in a pattern on a cardboard or wooden base.
- Hang the base on your wall.
This simple design adds a nice touch to plain walls.

Credit: diyjoy.com
Making a Flower Wall Decor With Ice Cream Sticks
Flowers always look beautiful. You can create a flower using sticks and paint.
Materials Needed:
- Ice cream sticks
- Glue
- Paints (red, green, yellow, etc.)
- Small circle cut from paper or cardboard
Steps:
- Paint the sticks in colors you like for petals (for example, red).
- Let them dry.
- Glue 6 sticks around the small circle to form petals.
- Paint a few sticks green to make leaves.
- Glue the green sticks below the petals as leaves.
- You can glue the flower on a wooden board or cardboard.
- Hang your flower on the wall.
This flower wall decor looks lovely and bright.
Ice Cream Stick Wall Sign
Personalized wall signs are fun and simple to make. You can write your name or any word.
How To Make A Wall Sign
- Glue ice cream sticks side by side to make a flat base.
- Paint the base in a light color.
- Write or paint your word on top (like “Welcome” or “Home”).
- Decorate with small buttons or beads if you want.
- Let everything dry well.
- Hang your sign on the wall.
This sign adds a personal touch to any room.
Tips for Working With Ice Cream Sticks
- Use a hot glue gun for faster and stronger glue.
- Let glue dry fully before moving your project.
- Paint sticks before or after gluing, depending on design.
- Use a ruler to keep shapes straight and even.
- Be patient and work carefully for best results.
More Creative Ideas
You can also try these ideas with ice cream sticks:
- Make a small wall clock frame.
- Create a butterfly by gluing sticks in wing shapes.
- Build a small shelf or box for keys or small items.
- Make colorful stars or hearts for holiday decor.
- Design a mirror frame with sticks.

Credit: www.youtube.com
How to Display Your Ice Cream Stick Decor
Once your project is ready, you can hang it on walls easily.
- Use double-sided tape for lightweight pieces.
- Small nails or hooks work for bigger or heavier decor.
- Use string or wire glued to the back for hanging.
- Place smaller decor on shelves or tables.
Change your wall look any time with new designs.
Benefits of Making DIY Wall Decor
Making wall art yourself has many good points:
- It saves money compared to store-bought decor.
- You get to use your creativity and ideas.
- It is a fun activity for kids and adults.
- You can make unique pieces that match your style.
- It helps reduce waste by reusing materials.
DIY projects like this make your home feel special and warm.
Frequently Asked Questions
What Materials Do I Need For Diy Wall Decor With Ice Cream Sticks?
Basic supplies include ice cream sticks, glue, paint, scissors, and decorative items.
How Long Does It Take To Make Ice Cream Stick Wall Decor?
Most projects take 30 minutes to 2 hours, depending on complexity.
Can I Paint Ice Cream Sticks Before Or After Gluing?
Painting sticks before gluing helps avoid mess and gives a cleaner look.
What Types Of Glue Work Best For Ice Cream Stick Crafts?
Craft glue or hot glue works well for strong, quick bonds.
Conclusion
Ice cream sticks are a simple tool for beautiful wall decor. You can make frames, shapes, flowers, signs, and more. All you need are a few supplies and your imagination. These projects are easy and fun for everyone. Try making your own ice cream stick wall decor today. Enjoy decorating your home with your handmade art!


Leave a Reply